Face recognition: Enrolment and Verification of end-user facial biometrics
Introduction
Enrolment
Batch enrolment
Verification
How does it work business-/process-wise?
How does it work technically? (Integration)
Introduction
Face recognition is one of the forms of biometric authentication. It is used to -for example- verify that the person presenting the document is the same person as the one who enrolled with the document in a KYC (Know Your Customer) process, or independent of it, as the additional- or only method of verification.
Usage during KYC process is described in the KYC with NFC document read guide as well as in the KYC document scan guide. Here, we are talking concretely about processes of enrolment and verification which may or may not be used together with the KYC process.
Generally, biometric authentication is defined as "something you ARE".
It is one of the three factors of authentication, the other two being "something you KNOW" (passwords, PINs, etc.) and
"something you HAVE" (tokens, cards, etc.).
Some companies (our potential partners/customers) choose to use biometric authentication as the only method of authentication, while others use it as an additional method, together with one or two other factors. Latter makes authentication far more secure.
MachineSense recommends to use biometrics as an additional method of authentication, at least as a second factor (2FA).
Typically, you would want to add biometric information of your end-user to your database, alongisde other methods (for example: username and password) and later use it for verification as a second (or even third) factor. In order to achieve any of these methods, you need to enroll your end-user with their biometric information. This is done in the process of enrolment.
Later, when you want to verify that the person attempting to enter the platform/system is the same person as the one who enrolled with the document, you would use the process of verification. This is done by comparing the biometric information from the enrolment data with the real-time biometric information from the end-user.
Thus, at the moment of introducing biometric authentication, you would first enroll your end-user with their biometric information (facial information in this case), and later use it for verification on a kind of a real-time selfie snapshot or video.
Enrolment
Enrolment of your end-user might take place, most commonly, either during:
- The KYC process where you have options of enrolling the user's document photo or selfie used confirm the identity of
document bearer, or both. During the process of enrolment, this information will, by default, not be saved or anyhow stored
on MachineSense servers, but will be sent to you, our partner/customer.
Furthermore, by default, facial enrolment information will not be retained (by you) in the form of an image, but will be at this point processed and returned as a vectorized (non-PII) information. This information is not usable for any other purpose but biometric verification. - Creation of user-account by other means (form on your web-site which initiates user identity and assigns a user-name and password, for example).
-
Upgrading of a user-account where you might want to add biometric authentication as an additional method of authentication
later, either for improved verification strength, for compliance with authorities requirements or simply for user's convenience.
Typically, this is done by asking the user to perform a selfie in order to later improve the verification process. Similarly to other occasions, vectors of this selfie are stored in your database alongside the other verification data and from that moment on - your end-user may use real-time selfies when entering the system.
MachineSense is, by default not retaining any of the data from your users: Neither imagery nor vectors. Our service is processing
this data in memory, in real-time and sending you the relevant results.
Also, by default, MachineSense will send you back the vectorized (non-PII) information on your end-user. Optionally, you may choose
to also receive the imagery (selfie face-images and/or document face-images) of your end-user.
Sometimes this might be even required by your local authorities, but in most cases it is not needed and is not recommended. It is
much more sensible to store only non-PII (not Personally Identifiable Information) data, which is not usable for any other purpose,
and from which images (in case of data leakage and/or other system calamities) cannot be restored afterwards.
Usually, businesses/institutions enrol their end-user with a single face-vector, but MachineSense is offering the possibility to
enrol the end-user with multiple face-vectors and also to later re-enrol the end-user with new face-vectors. Theoretically,
matches are the best when the vectors are the freshest, but in practice, the difference is not that big. However, you may see
some improvements if comparing the latest enroled selfies with log-in real-time selfies then comparing the current one with images
from documents, which might be many years old.
If you decide to keep multiple vectors, you also have an option to send multiple vectors (for example - the latest two) to our
verification API, and to use the one with the best match, or to make a decision based on the average return value, etc.
Enrollment data (vectors) are quite small (and certainly smaller than images), so you may choose to store them in your database without burdening it too much. You may expect (depending on the method of vectorisation) to receive face-vectors of size between 1 and 2 Kbytes. This data can be painlessly stored alongside other authentication data, possibly already present.
Batch enrolment
MachineSense is offering the possibility of batch enrolment of your end-users. This is done by sending us a batch of images
(selfies or document images) and receiving back the vectorized (non-PII) information on the faces in those images.
This is a very convenient way of enrolling your users, especially if you have a large number of users to enroll.
Normally, any web-portal nowadays has a large number of user already, and it might not be feasible to ask them to perform a selfie. In these cases, if you have images of those users (or service providers), it might be more convinient to do the batch enrolment.
However, there are few considerations here:
- Mind it that batch enrolment is not a replacement for the KYC process (as any standalone enrolment is not a replacement for KYC). KYC process is still needed in order to verify that the person presenting the document is the same person as the one who enrolled with the document in a KYC (Know Your Customer) process, or independent of it, as the additional- or only method of verification.
-
You may (and most probably do) need user-consent and choice confirmation of wishing to identify via such biometric process.
If that is the case, you should present the enrolment steps after aquiring such consent. Most typically, you'll ask your
users to add biometric authentication to their account, and then you'll present them with the choice of either performing
a selfie or uploading an image.
If image is uploaded, there is no possibility for liveness detection, of course. - Batch enrolment is in most of the cases not so accurate as the real-time individual enrolment. This is because the images are not taken in the same conditions, and are not taken in the same manner. For example: If you are doing the batch enrolment, you may not be able to ask your users to perform a selfie in the same manner as you would do it in the real-time enrolment, whereby your later comparison results will not be uniform.
It is, generally, not recommended to do the batch-enrolment, but for the special cases we do provide this as an option. These special cases are mostly covering the situations where you wish to mass-enrol some providers of online services, and not the end-users.
Verification
User-verification is most commonly done on the system/portal log-in, or on the entry of a particularly sensitive part of the system. It may also be done periodically during the session, in order to verify that the user is the same as the one who logged in (for example: on payment steps or confirmation of a specific action).
Verification is done by comparing the real-time selfie of the user with the previously enrolled face-vector(s). This is done by sending both the enroled vector and a real-time selfie to our verification API, which returns the distance between the two faces. This distance is a measure of similarity between the two faces. You may choose to use this distance as a threshold for your verification process.
MachineSense provides some guidelines of possible thresholds, depending on the security level that you, the customer, want to achieve.
However, you may decide to interpret this result any way you wish, and to set your specific distance-thresholds.
For example: You may decide that the distance of 0.5 is a good threshold for your system, and that any distance below that is a match. In
some other scenarios, you may go for the threshold of 0.6, etc. (Values here are between 0 and 1.)
Choice of distance-threshold is dictating the rise or fall of false positive matches or false negative matches. Smaller the parameter, tighter
the check is and more false negatives may occure during the verification process. And vise-versa.
As a rule of thumb: Some kind of "standard" distance threshold would be 0.6. This would mean that any match below 0.6 is a match, and any
match above 0.6 is not a match. This is a good starting point, but you may choose to go tighter or looser, depending on your needs.
If you are operating a very sensitive process, which requires tight authentication, you may want to lower the threshold to 0.5 or even 0.4. Yes,
there will be some false negatives, but you can circumvent those by asking tighter requirements for user-selfie (lighting, image quality, etc.).
On the other side, if your process is not that sensitive, you may choose to go with a higher threshold, like 0.65. This will result in
less false negatives, but will also allow more false positives. This might be good for user convinience, and might be good enough in
situations where you already authenticated user by other means, or have pre-funneled a possible match and are looking just for final
authoritative comfirmation.
How does it work business-/process-wise?
Enrollment process:
- At some point either while registering a new user or while upgrading an existing user's account, you may choose to add biometric authentication to your system. This is done by asking the user to perform a selfie. This selfie is then sent to our API server, which returns a vectorized (non-PII) information on the user's face to your back-end.
- This information is then stored in your user-database, together with the other identification data, ready to be sent to MachineSense verification API server when needed.
- You have a possibility of storing multiple enrolled face-vectors. If you do so, you may send one of those vectors for verification (most typically the latest one, since matches are the closest in this case) or you may send multiple vectors and make a decision based on the average return value, or on the best match, etc.
Verification process:
- When you need to verify your users, you'll send to MachineSense API one or more saved vectors created during the enrollment process. You will also set some other call-parameters and provide your API-key. In return, you will get a session-key.
- From your client-side application you will send a selfie of the user, together with the session-key received in the first step.
- MachineSense Face-API will then compare saved vector with the current selfie (user attempting to authenticate on your system), will perform liveness detection (if you opt for it, see Liveness detection description for more details) and will send you back the results in form of Distance-measure. You may choose various distance-thresholds in order to determine if you accept the face of this user as valid, depending on the strength of control that you want to perform.
Similarly to the other processes, MachineSense is, by default, NOT RETAINING THE DATA.
All the data is sent to our partner/customer, and is not kept on our servers. It is only a pass-through real-time
transactional service.
Optionally, if customer wants it and is legally allowed, MachineSense may offer secure enrollment data storage, but
this is not the default option, and is usually not something our customers wish or are allowed to do by law.
During both enrollment- and verification- processes, one of the possible session-options is to ask MachineSense API to return imagery (jpegs) of the selfies, in addition to the non-PII vector information. Imagery is, of course, PII, and you are advised to store/process this data according to your local juridical guidlines and recommendations. However, this is something that you, as our customer, may opt for, and is completely dependent on your choice/need/preference.
How does it work technically? (Integration)
Integration process with MachineSense NFC-KYC is quite simple. It consists of the following steps (see also the
diagrams):
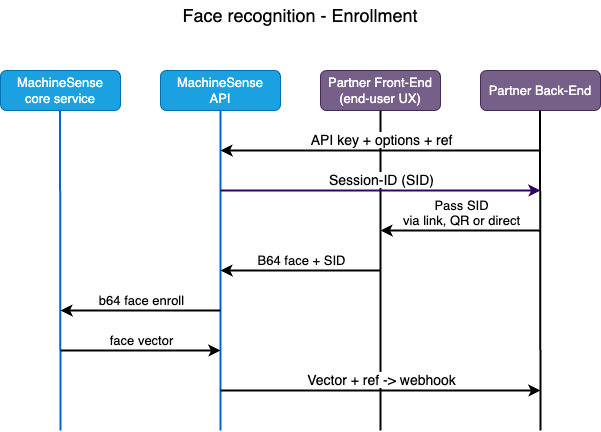
Enrollment:
- Call MachineSense API server, providing your API-key and the details of the scenario you want to execute (for example: Do you want liveness detection to be performed, and in what form, pass over some user-info that you wish to receive together with the biometric response, etc.)
-
Our API accepts the request, and returns a unique session ID (USID) to your back-end. This session ID
is used to identify the session and all the data that is sent to our API server in the following steps.
-
Pass this USID to your client-side application (web-site, mobile app, web-app, etc.)
Capture the selfie of your end-user and send it to our API server, together with the USID code.You may choose to buld your own face-capture HTML/JS code or use our HTML/JS sample, or our WASM component. Whatever manner you choose, captured image needs to be sent to our API server. Image should be large enough (at least 400px high) and featuring entire face of the user. Image is sent over as a base64 encoded JPEG.
If using our sample or WASM, your users don't need to interact, because we automatically detect if their (entire) face is within the oval target and we prepare the image in a correct size/format. - Our API accepts the request and processes the image. API returns the vectorized (non-PII) information on the user's face to your back-end, together with (optionally) liveness detection result(s).
-
Store the vectorized information in your database, alongside other user-identification data.
It will be used later for verification of the user.
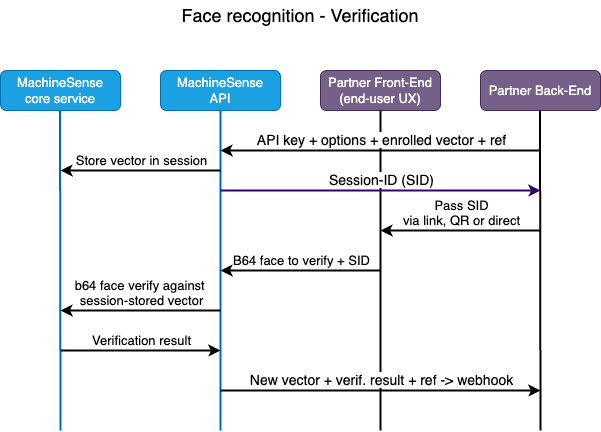
Verification:
- Call MachineSense API server, providing your API-key and the details of the scenario you want to execute (Face verification), together with the enrolled vector(s) of the user that you want to verify.
-
Our API accepts the request, and returns a unique session ID (USID) to your back-end. This session ID
is used to identify the session and all the data that is sent to our API server in the following steps.
-
Pass this USID to your client-side application (web-site, mobile app, web-app, etc.)
Capture the selfie of your end-user and send it to our API server, together with the USID code.
You may choose to buld your own face-capture HTML/JS code or use our HTML/JS sample, or our WASM component. See above, under "Enrollment".
- Our API accepts the request and processes the image. API returns the distance between the enrolled vector(s) and the current selfie of the user, together with (optionally) liveness detection result(s).
-
You may choose to accept or reject the user based on the distance returned by our API. You may also choose to
accept or reject the user based on the liveness detection result(s) returned by our API.
Distance thresholds are something that you may choose to set yourself, depending on the level of security that you want to achieve. MachineSense provides guidelines for typical cases, but you may choose to interpret the distance any way you wish.